Monday 24 February 2014

Terrain Edit - Vertext Painting

I wanted to find a way to break up the floor texture, So I decided to look into the terrain editor with this tool in UDK you can create a piece of terrain and apply multiple textures (Materials) and paint and erase them as you select each texture you can also add height to the terrain bumps and indents, I feel this will be a great tool to use within my scene.

UDK  - Terrain Editor


The image below shows a quick practice in how this works when vertex painting within the editor itself as you can see as long as both materials are seamless they will blend in quite well you also can adjust the strength in-which you pain which helps to blend in further.

Vertex Painting - Test

Saturday 22 February 2014

Going beyond the concept

So I started looking at my scene and the direction it is currently in and although I am following the concept to the best of my ability, It does not seem to offer a main attraction for the viewer this it seems to lack so I've decided to add to this and make my own, I think having a street section with medieval buildings I feel this will allow a main point of view as well as break up the scene.

Image 1. showing how this fits into my scene at a basic level, image .2 showing medieval building 1. which is work in progress, I will be producing only three building types, I started this with modular pieces but I found it to be very time consuming for myself during the production process, although this is a great technique for level design for this particular project, I will produce three building varied shapes and sizes, they will each have individual textures for the extra variation I can have doubles of the textures with varied effects this may help break up the building if they become too repetitive. Building one contains only 280 tris at its current state which is great for memory consumption.

image 1. 


Image 2 - Medieval Building, 280 tris


Friday 14 February 2014

Trying to break things up - Trims


After finishing my wall and floor textures, I took a step back and noticed how repetitive it looked, I know that once I have created more assets the scene will come together but the texture itself wall/floor both look to repeated for my liking.


Before I move onto the wall texture I started looking into various ways to break up the sense of repetition, So I looked into trims which are great way to cut out noticeable repetition, as you can see below I have added two trims that go in between the floor these are made up of another asset which is the same length as the floor asset so it connect easier (modularity) it works top/bottom also to the sides if needed, I do think this breaks it up.

I did find difficulty which what texture I should use for the trim I tried several ideas but I went back to the floors texture and worked from that, as Realistically it would be made from the same material as the floor (Stone), So my next steps will be this with the wall textures around my scene, although it should not be too noticeable once I have added in windows, ledges, torches and city flags which will break up the overall wall.


Finding the right texture

As an 3D artist I think that the most important part of the 3D process is the texture work, to me anyone can 3D model, but the models come to life with the texture the artist has created so this to me is the main part of being a 3D artist.

As I finished my main floor texture I started looking for a texture I could use for my wall, I could not just grab any old texture and hope it works well as I'm working from a concept art is also needed to be relevant to that, It does not have to be the exactly same just similar and needs to make sense for this scene. 

So I started looking at various stone wall textures which I think would look well within my scene (Image below) although I have only chosen one main texture for my wall I will still keep the others if and when I need to add varied stone work within my scene.


I began to work on my chosen texture within Photoshop I needed to make it seamless like my previous texture, I also wanted to bring out the color of the stone work after this I started to work on the material set-up within UDK, again I used normal and specular maps and a bump offset tool to define the stone work, I believe this material does need more work on the normal map as its still not as defined as I would like. (WIP - Material Below)

Wall Texture _ UDK Set-up
Image below both wall and floor textures at their current states within UDK. 

Floor, Wall inside UDK


Friday 7 February 2014

UDK - Material Enhancement, Displacement map

Displacement map is a technique which works hand in hand with bump mapping and normal mapping in-which you use height mapping to give a certain desired effect over the geometry, it pushes out the surface texture to give a greater sense of depth and adds extra detail.

This technique I think will really help my scene come to life with this added extra depth, I added this to my stone floor material in UDK with a simple set-up using a bump offset expression and while combining both the diffuse texture and normal map.


Comparison shown below, with bump offset and without.                                                                    
Without displacement map 
Displacement Map


Both in UDK game editor

Saturday 1 February 2014

Texture Creation - Stone Floor

As an environment artist I am tasked with not only the development of the 3D assets but also the textures maps to go with them, The texture is what really defines the model as a noticeable asset, I decided to start working on a main texture for my scene, the stone work for the floor as the concept show the scene is not completely full of various assets, the key to this scene is the sense of realism within the environment itself and this will take place within the textures and later on shader work.

Stone Floor 
I found myself a simple stone floor image, my main issue with this image is that it was not seamless this means when I start putting parts together there would be seams on the 3D asset which is not something I want as this is very noticeable, So I used a technique in-which you can turn an image into a seamless one, using simple tools within Photoshop such as the blend and clone tool, first you must offset your image, for example I made this image so that it was 1024x1024 pixels, use the offset filter and offset but
512x512 and this will create an image which is seamless on all four outer sides, so once the seams within the middle of the image are cloned/blended you have yourself an seamless image.

Offset
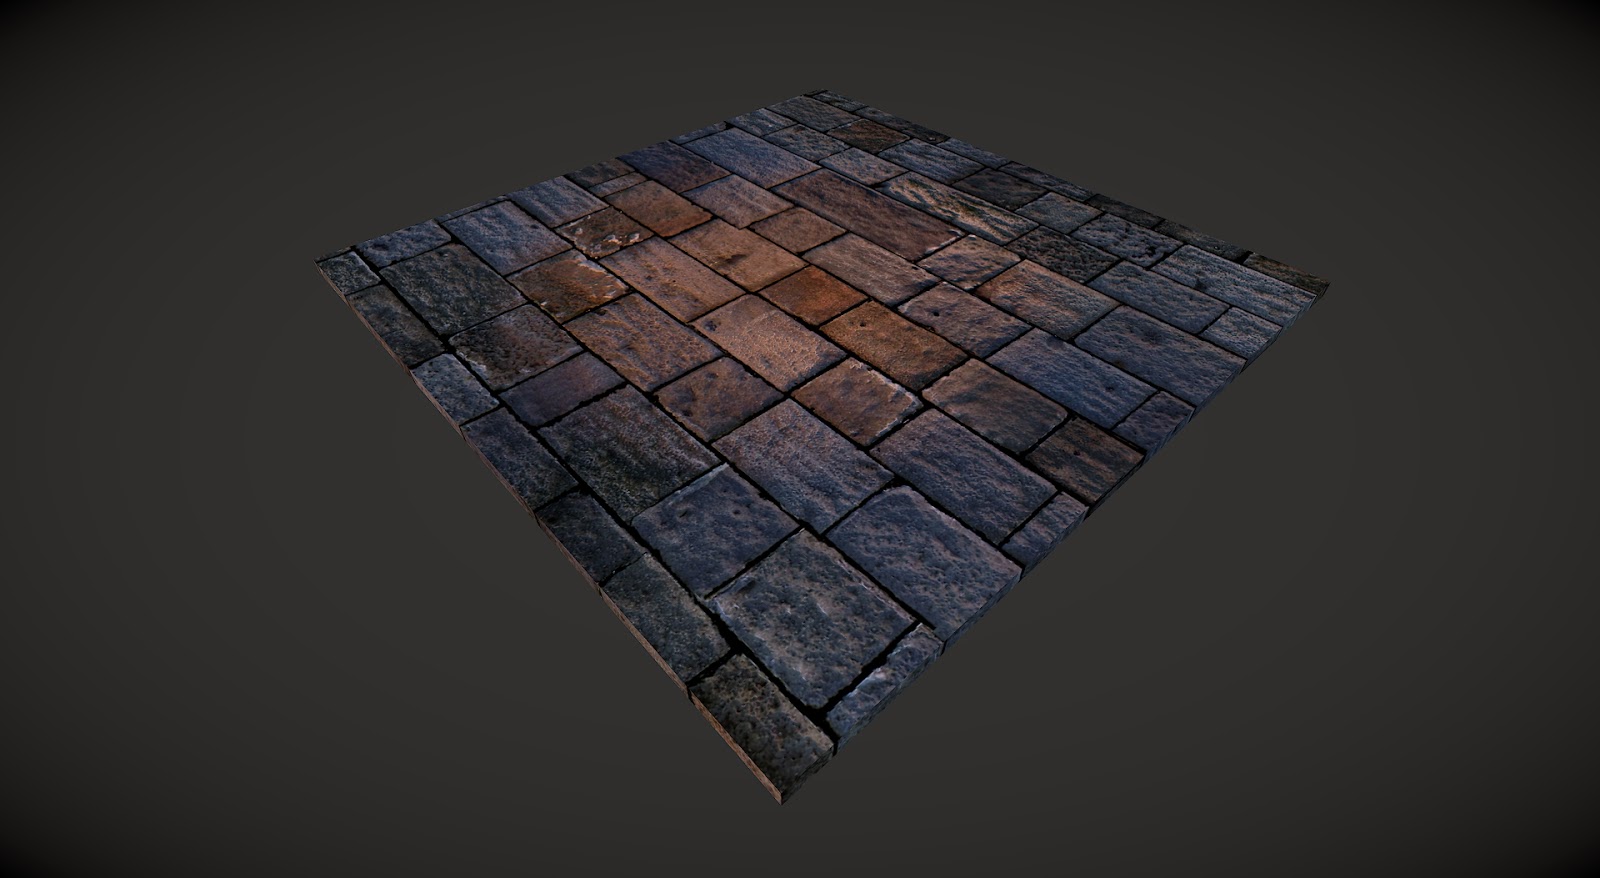
Once I finished this process I was able to develop the texture so that it fits within my scene and concept used. Image below shows Diffuse,Spectacular and normal maps within marmoset.


Stone Floor - Render 


Normal Map

After looking back at my stone floor although I am happy with the overall texture e.g. Diffuse and Specular maps I still think the normal map is too flat, so I decided to try and increase the intensity of the normal map using Photoshop, I layered the normal map over top one another within the canvas and overlay them using Hard light and Soft light to get a more intense normal map, Image below showing the increased normal map, this may be too intense but it has definitely added the extra depth I wanted.


,

Asset List

Asset List

Main assets
  • ·       stone tower
  • ·       medieval buildings (modular)
  • ·       stone floor (Texture, single stone pieces)
  • ·       Wooden floor (texture, single planks)
  • ·       Stone bridge
  • ·       market stand/store
  • ·       barrack tower
  • ·     city wall (stone)

Props
  • ·        Barrels
  • ·        crates/Boxes
  • ·        Torches
  • ·        sand-bags
  • ·        wooden cart
  • ·        Wooden Barge
  • ·        Stone Doorway
  • ·        signs (tavern)
  • ·        Flags (cloth physics)
  •             Lanterns

environmental
  • ·        water (shader)
  • ·        weather (Rain)
  • ·        puddles (shader)
  • ·        vertex painting
  • ·         lighting